The Evil Spell of Osiris
Let Lara fall, passing through the flame, and to the water
below. Use a large
medpak on the way down to survive until Lara enters the water.
Carefully time a swim
through the circular slicer. Just around the next corner is an underwater
lever in the ceiling. Pull it to open
the trap door ahead, just past the next circular slicer. Climb through the trap door into the room
above. Shoot the vase furthest
from the fountain to access the reach-in switch behind it. (Activating the
reach-in switch behind the other vase just releases some scarab beetles).
The switch to opens the door in the NW corner of the room. Run to the end of the newly opened corridor,
minding the spikes that shoot down from the
ceiling. Light a flare and make a note of the code on the wall (you
will need this for solving the puzzles to come). Pull the lever on the wall to open the door in the SE corner of
the room outside. Head through this
door and to the end of the corridor, timing your run past the spikes. Use a
flare to read the code on the wall (make a note).
Now head around the corner
to the water opening. Before jumping
in, jump over to the landing on the left and pick up grenadegun. A skeleton will
attack from behind. Destroy it or just
jump in the water to avoid it. Swim to
the end of the water tunnel to emerge in a room with a mummy. You may want to destroy the mummy with a grenade so
it won’t interfere with what follows.
First, go the SE corner of the room to find some Uzi clips. Lara seems
very interested in a window high on the south wall. From the other side of the room, use the binoculars
to view the symbol behind the glass.
Make note of it for an upcoming puzzle.
Next , push the lever in the
NE corner of the room to raise a block in the center. Immediately turn and run toward the block, jumping on top as you
approach.. Jump to grab the ladder in the opening above. Immediately do a back flip from the ladder
to land on the platform behind and run to activate the reach-in switch (which
opens the door at the other end of the passageway). Quickly turn, run and jump across the gap as a revolving corkscrew spike descends from the ceiling.
Enter the next room and
notice the lever in a depression, covered by a crystal pyramid. Now line up a run at the LEFT side of the
deep pit. Lara must jump so she lands
toward the closer edge of the of the wooden planks, continue running and jump
again to grab the edge at the other side of the pit (the planks quickly collapse
once Lara touches them). Climb the
block to the left, run down the passageway and jump in the water to escape the ice demon. The
current carries Lara to the end of the pool.
Swim through the opening. Swim
past the first opening on the left and turn right into the next one. Climb out of the water and pick up the small water skin. Save your game.
Back in the water swim down
the sloping tunnel on the right and through the opening at the
bottom. Stay low as you swim ahead to
avoid the horizontal slicing
blade that zips through. Pull
the overhead lever at the end and return for some air above. Save your
game. Next, swim back into the
corridor where you entered and turn right.
At the end, swim up and through the top opening. Pull the overhead lever, then return to
replenish your air supply at the same opening as before. Save your game.
Now, swim back into the
tunnel and to the right. This time,
swim down at the end and out into another pool (you can’t get air – it’s
covered by ice). Swim to the end of the
pool, ignoring the first opening on the left.
Swim up to a point where you can go straight or to the right. Go right.
At the next juncture, go right again and follow the tunnel until you
reach an opening in the ceiling. Swim
up and find the next overhead lever to pull around the corner.
Quickly return the way you
came. At the juncture where you turned
right last time, take the other tunnel and follow it to an opening where Lara
can get some air (this will also be the exit from the water maze). Save your game. Now continue down this water
tunnel until you reach a juncture with an opening on the left. Go left.
Straight ahead and up a bit is a nook with a small
medpak. Grab it if your air
supply is high enough (otherwise, return for it later). Follow the tunnel below the nook to the
right. At the juncture, take the high
tunnel to the left and find the final lever.
After pulling it, a cut scene shows the door opening at the exit of the
water maze. Quickly swim back to the
opening.
Safety drop to the floor of
the pit. Climb the ladder at the other
side. Stand at the edge of the pit, in
front of the wooden platform. Do a
simple jump to it, then another simple jump to the next, followed by third
simple jump to the landing at the other side.
The gate to the right is now open, but first go back to the left and
over the pool which is now covered by ice and pull the lever. Now return and go
through the open gate and pull the lever at the end of this trench. An ice demon
is now in pursuit, so quickly run back and run over the ice-covered pit to the
now-accessible lever in the depression near the entrance. Push the lever to open the exit in the west
wall.
Go through the open exit and
stop halfway through the short tunnel.
To the right, Lara can pull up into another short corridor to find a
small pool of water, Jump in and let the
ice demon extinguish itself (if it followed
you). Pick up the large water skin from the bottom of the pool.
In the next room are 2 large
vases. Lara must pour the correct
amount of water into the vase on the left to open the next door. Pouring in the
incorrect amount will release a mutant beast.
The correct amount was revealed earlier by the symbol in the room with the mummy. (Note: For the solution to the code and the
water puzzles, see the notes at the end of the walkthrough. If you haven’t played TRLR and don’t know
how to use the skins, see below).
Using the Water Skins
To fill an empty skin, stand
in the pool, select it in inventory and “Use.”
To empty a skin which contains some
water, select the skin in inventory and
“Use.” To move water from one skin to another, select the skin in inventory and
“Combine,” select the other skin to combine
with.
Once you have the correct
amount of water in the large water skin, you
should also have 3 liters in the small one.
Lara can first get 2 Secrets by
pouring the wrong amount in the vase.
This will raise a block near the second vase. Lara will need to stand on
the small rise next to the block to be able to reach the top. The mutant beast will
now be loose, so Lara will have to get to the top of the block while avoiding
the beast (good luck!). Once on top of
the block, follow the crawlspace through to the next room. Drop down and climb the block on the east
side of the room to access the crawl space (you can ignore the reach-in switch
In the NW corner).
Follow the crawlspace all
the way to its end (past the first opening).
Climb the ladder at the end of the corridor and then climb the series of
blocks. At the top, destroy the mummy (or just run past it if you want to save the
grenade). Follow the passageway to its
end and drop down to the lower corridor and find yourself overlooking the area
where the level began. With Lara’s back
to the opening, drop back , slide and grab the ledge, Shimmy left around the corner until Lara is over the black &
white tile. Drop and grab the edge
below and pull up. Follow the corridor
to find Secret #1: grenadegun normal ammo. Don’t slide down the ramp.
Return toward the black & white tile over the pit.
The fixed camera makes the
next part tricky. Save your game. Standing at the center and back edge of the
tile, do a right jump. Continue to hold
the “jump key, then grab a crevice.
Shimmy to the right until Lara can climb up. Use the crowbar to get Secret #2: a gold star.
Next, jump over the flame and to the right. Lara will slide down and find some revolver
ammo. Step up on to the small
slope in front of the ladder, then do a simple jump to grab it so Lara can
climb back up. Slide down the ramp and
exit through the corridor and crawl space.
Activate the reach-in switch to raise a block under the other crawl
space and use it to return to the water puzzle room. Shoot the mutant beast from the
safety of the raised block.
Lara can now pour the
correct amount of water in the vase to open the exit at the south wall. Before leaving, look at the symbols high on
the east wall. Save yourself a return
trip by having this amount of water in the large
water skin before leaving this room.
As Lara enters the next
room, a skeleton attacks from the left and a golden phoenix from the right. To open
the exit door on the other side of the pit, Lara must shoot the 4 gems in the
lions’ mouths, located in the alcoves high in the wall around the perimeter of
the room. Begin by pulling the lever at
the top of the short stairway near the entrance. Pull out the revolver with telescopic
sight and run over the adjacent black & white tile to raise the 4
wooden platforms over the pit (the platforms are on a timer, so move
quickly). Still running, turning to the
right and make a long running jump to the first platform on the east side of
the room. Turn and shoot the gem. Holster the weapon and make a running
jump/grab to the far platform on the same side of the room. Shoot the gem and immediately do a running
jump/grab back to the first platform.
Turn and do a running jump grab to the platform to the west and shoot
the gem. Do a running jump/grab to the
last platform and shoot the gem. Make a
running jump to the landing by the now-open exit door. (NOTE: You can also
return and step on the black & white tile to reset the timer after shooting
the first 2 gems)
Turn back to the north and
make a running jump to grab the far ladder, then do a back flip and roll to
grab the ladder behind it. Shimmy
around the corner and climb down to the bottom. A bat and a skeleton will attack.
After disposing of them, shoot the first vase. Continue north and shoot the next vase to get grenadegun ammo.
Around the corner, another vase holds revolver
ammo. Continue south, but do not
shoot the last vase (or a horde of scarab beetles
will appear). Back near the ladder,
there is another black & white tile in a depression. Pick up the small
medpak (notice that standing on this tile raises a 5th
platform near the ladder above). Jump
back up to the floor on the left. Turn
west, jump and grab the back of the short green stone wall on the other side of
the ladder. Climb over and slide down
the other side. Turn and climb the west
face of the ladder. As Lara nears the
top, do a back flip to the wooden platform then angle a simple jump to the
landing by the open door.
The lever by the door can be
used to raise the 2 western platforms if you need to return for water (pull it
down, then up).
As you enter, take note of
the symbols high on the south wall to know how much water you’ll need for the
water puzzle following this one. Pour
the required water into the left-hand vase, then go through the open gate on
the south wall. As you enter, sliding stone blocks begin to move back and forth
across your path. Standing as close as
possible, time jumps past the first 2. Before jumping past the third, line Lara
up with the rope in the room beyond (make sure your health is charged up
too). Jump past the block, slide down
the ramp and jump to grab the rope. As
you grab the rope, an air demon charges out to
attack Lara. In the far SE corner of
the room is an opening to a pool of water.
You can get there by swinging to the next rope, then swinging over to
that corner. Another way is to use the
first rope to swing over and land on the sloping wall on the right side of the
room, then jump back and forth between the 2 slopes, while angling to the
right, until you reach the water opening.
Once in the water, swim eat
and look for an opening in the ceiling.
Climb out and run to the east end of the room, Jump to the other side of the next pool and activate the reach-in
switch in the NE corner. Return to the
water opening and swim past the open gate in the NE corner of the pool. Wait by the golden bird statue until the air demon is destroyed. Find the overhead water lever in the corner of this room and pull
it to open a door in the room above.
Return to the room where you used the reach-in switch. Before leaving, stand on the raised spot in
the pool and fill the water skins with the
right quantity of water for the next puzzle.
Head through the open door
on the south wall and use the monkey bars to swing past the flame pits, passing the flame
blowers when they are off. At
the other side, destroy the mummy that waits for
Lara, or just run past it and save your ammo.
Climb up to the black & white tile and jump down to the small
depression on the left to get a small medpak. Jump back up to the black & white tile
and line up a running jump to the nearest rope, then swing and grab the next
rope. Swing over to the landing beneath
the ladder in the NW corner. Lara can
now safely slide back down into the spike area near the west wall to pick up Secret #3: large
medpak. Climb up the nearby
ladder. Positioning Lara at the center
line of the ladder, do a back flip and roll and grab the rope. Swing over to the landing again and use the
ladder and crawlspace to exit.
Back in the water puzzle
room, go through the open door in the east wall. After jumping through the second circular
slicer, kneel down until a horizontal slicing blade flies by. Jump through the last circular slicer and
shoot 2 golden phoenixes that ambush Lara in the
next room. Approach the gate at the
east end of the room and enter the passage to the right. Time a run past the spikes
and push the lever. Return to
the main room and enter the passage opposite.
Slide down the slope and do a standing jump over the flame to grab the ladder. Climb up and wait at the top of the ladder. When the flame
blower begins to subside, immediately climb off and run to activate the
reach in switch. Jump back and off the
landing, grabbing the top of the ladder, before the flame starts again. Do a back flip off the ladder, turn and jump
up the slope to the main room. The gate
is now open.
When Lara enters the gate, a
flyby shows the room ahead as the gate shuts behind Lara. When the flyby ends, run to the right and
jump over the black diamond tile to the black & white star tile near the
open door (note: the black diamond tiles are all death
traps). From there, jump to the
raised platform in the center. Next,
making a running jump to the black & white star tile in the SE corner (in
front of the door with the purple-ish light).
Quickly step off the tile and into the doorway before the tile bursts
into flame.
(There is no need to try and enter any of the other 3 rooms off the main
room – they only hold bad things for Lara).
From the doorway, use the revolver with telescopic sight to shoot the 3 gems
in the lions’ mouths (high on the east wall).
Find the opening in the ceiling behind you and jump to grab the
ladder. Climb to the room above. Note the lever protected by the flame blower.
Jump over to the small landing by the ladder. Mount the ladder and climb around the corner. Do a back flip to land on another small
landing behind (climbing the ladders triggers the blocks to fall). Continue around the room in this way,
pulling the lever in the northern alcove and IGNORING the levers in the corners
of the room (they are death traps). Along the way, blast the skeleton on the NW corner landing and retrieve the grenadegun
ammo there.
When you arrive at the far
end (SW) of the room, shoot a couple bats and
pull the lever in the alcove by the door with the face of Osiris. Jump to the
SW landing to get the Uzi clips. Lara can now pull the lever by the ladder
where she first came up, but make sure she has full health as a trap door opens
and she has a bit of a fall (grab a ledge if you can and safety-drop to
minimize the health loss). Back below,
the exit is now open. But first, return
up the ladder to get a Secret. Jump from landing to landing (the ladders no
longer work) to make your way to the NW corner. A raised block now gives access to a crawlspace and Secret #4: flares + revolver
ammo. Return via the ladder to
the room below and exit to the next
room.
As you enter the passage to
the next room, the gate opens behind you.
If need be, Lara can return to the pool near the rope room to get
water. Otherwise, place the required amounts,
first in the vase by the east wall, then the one by the west. A door opens in the SW corner to reveal a
lever. Push the lever to open the gate
in the NE corner of the room.
Immediately turn and run as quickly as possible through that gate. Watch out for the spikes
as you enter. Lara must push the
3 levers in this room before the revolving corkscrew
spikes descend to far over them.
This will open the exit door outside in the north wall, but you must get
through it quickly as a revolving corkscrew spike
begins descending there as well (if you are REALLY fast, you can also pick up a
small medpak in the room with the three
levers.
Past the exit Lara slides
down a ramp. Jump and grab the pole
before she lands in the lava pit. Shimmy around to the other side of the pole
and back flip to the slope below. A
flyby shows the room ahead. When it
ends, move quickly as another revolving corkscrew spike
is coming down over Lara’s head.
Roll and make a running jump to the first wooden planks. Stop and quickly do a simple jump to the next
followed by a simple jump to land on the sloping wall to the left. Slide down and grab the edge. Pull up and do a back flip to another block. Climb to the higher block and pull the lever to open the exit
door.
Now, jump to the nearby pole
and turn Lara so her back faces east.
The next part takes some trial and error, so save your game. Lara must back flip to some collapsing
wooden planks, back flip again to another platform which will quickly collapse,
turn left and jump to grab a ladder on the wall. Shimmy around to the left to step into a small alcove and
immediately jump up to grab some monkey bars and head south. Swing over and drop on a small landing to find
Secret #5:
grenadegun flash ammo + revolver ammo.
Quickly turn around and jump to grab the monkey bars and swing back past
the little alcove before a flame blower blocks
the path.
On the other side of the
alcove, drop and climb the stairs to the left.
Lara enters a room with 4 crystal pyramids. As she steps onto the raised
platform, the Horus effigy and the pedestal with the Amulet will burst into
flames. But the doors to each side will
open and demi-gods will attack Lara. Once they are destroyed, head through the
door to the south where the second demi-god came
from. At the back of the room, turn
right and find the entrance before you come to the closed gate. Go through the crawl space and emerge under
one of the crystal pyramids. A cut
scene shows a block falling in the room on the other (north) side of the Horus
effigy. Next, locate and grab the torch
on the floor. Return the way you
came. At the beginning of the crawl
space, Lara will have to throw the torch (space bar) to the other end, then
crawl through and pick it back up.
As you head back to the room
with the crystal pyramids, a fire demon will
attack Lara. Throw down the torch and
run through the crystal pyramid room to the room on the north side. Find the reach-in switch and activate it to
open the gate back in the south room,.
Head back and jump in the small pool to escape the fire demon.
Go back and find your torch and use the nearby burning torch on the wall
to light it.
Go back to the crystal
pyramid room and find 2 unlit torches around the perimeter, under the crescent
(number “2”) symbols on the ceiling) and light them. Now. Go back in the south room and in to the passage leading to
the small pool. Go into the first
passage (with the “3” symbol) after the raised gate. At the gap, throw the torch over and jump to the ladder on the
other side. Pick up the torch and light
the torch on the wall under the crystal pyramid. Return to the corridor (again, throwing your lit torch over the
gap).
Next, go the passage just
before the pool (with the “4” symbol over it).
Approach the first gap and throw the torch to the other side. Do a running jump over gap and pick up the
torch. Throw the torch over the next
gap and do a running jump over it. Pick
up the torch and light the torch under the crystal pyramid. Bring the torch and return the way you came.
Now go into the last (middle
passage). Standing at the edge, throw
the torch to the other side. Do a
simple jump/grab over the gap. Approach
the next gap and throw the torch over.
Jump back and do a running jump/grab to the other side. Make sure to hold the “crouch” key as Lara
climbs up or she will fall back into the lava pit. Crawl forward and pick up the torch. Crouch and throw it ahead, then turn and
crawl over and down. Pick up the torch
and light the one under the crystal pyramid.
A cut scene shows the gate opening in the north room.
Leave the torch and climb
back up to the crawl space. Turn and
crawl over into the gap and on to the ladder.
Do a back flip and roll to land on the other side. Head back to the crystal pyramid room and,
as you exit the south room, look for the grenadegun
ammo on the raised platform to the right. Continue to the north room and stand just under the open gate.
Jump to the raised slope and
run and jump quickly as giant stone blocks fall
down from above. At the gap, jump over
a lava pit and grab the other side. Pull up and enter a small courtyard where a skeleton lurks.
Straight ahead is a narrow window over a spike
pit. Go around the corner to the
left and find another window, looking into a room with the motorbike and 2 vases. Shoot the to vases, using the revolver
with telescopic sight (one grenade will also do the trick). Nearby, find another window and shoot 2 more
vases.
Lara can return now to the
sloping corridor and run down over the lava pit to
fall safely on a stone landing. Pull
the lever there, turn and do a simple jump to grab the ladder. Climb up and run toward the spike pit, jumping and grabbing the lower edge of the
window (the spikes will recede as Lara approaches). Climb through and head toward the motorbike
as the level ends.
Solution to Codes and Water Puzzles
In the 4 equations below,
the symbol on the left side is equal to the numeral in red (e.g., the crescent
symbol represents the number 2, and so on).
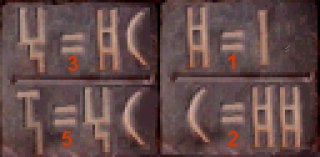
The top notation below indicates
that you will need 2 liters in one skin AND 5 liters in the other. The bottom equation calls for 4 liters.
Water Puzzle 1: The correct amount is 1 liter. Fill the small skin (3 liters). Combine it with the large, giving you 0 in the
small and 3 in the large. Fill the small skin again (3 liters) and
combine it with the large one to yield 5 liters in the large skin and the
required 1 liter in the small skin.
Water Puzzle 2: The correct amount is 4 liters. First, fill the large skin (5 liters). Combine it with the small skin, yielding 3
liters in the small and 2 liters in the
large. Empty the small skin, then combine it with the large, leaving 2 liters
in the small and 0 in the large. Fill
the large skin, and combine it with the small to get 3 liters in the small and
4 liters in the large.
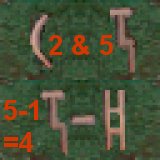
Water Puzzle 3: The correct
amount is 2 liters in the first vase (against the east wall), followed by 5
liters in the other by the west wall (the correct vase is always on the left as
you face them). Fill the large skin and
combine it with the small, giving you 3 liters in the small and 2 in the
large. Empty the small skin and combine
it with the large, yielding the 2 liters in the small skin. Fill the large skin to have the 5 liters.